Ever unintentionally put a hole in your drywall and need to repair it? You’re not alone. Even the most skilled DIYers make mistakes that require patching or repainting. In this video, we show you the step-by-step process for repairing a small hole in a wall (less than 2″ in diameter).
Supplies needed
drywall patch: Use a adhesive drywall patch and make sure the patch is larger than the hole.
sanding block or sanding sponge: You can also use sandpaper however a sanding sponge is easier and creates a bit less dust.
drywall knife: Also known as a putty or spackle knife, this tool will help make a smooth application of the spackle. Select a size that works for the size of hole and don’t use a knife that is too large or cumbersome for the task at hand.
sponge: Use a clean one and use it only for other wall projects afterwards!
spackle or pre-mix joint compound: Spackle is made specifically to fix minor dings or dents in the wall, is thicker than joint compound and tends to dry faster that joint compound. Pre-mixed joint compound, otherwise known in the trade as “mud,” is designed for larger drywall repairs or installations. For this type of project you can use either product (we used pre-mixed joint compound). You’ll only need a small amount so purchase a small container.
paint supplies: Roller brush or small bristle brush, primer and paint, drop cloth
mask: Wear a mask for the sanding process.
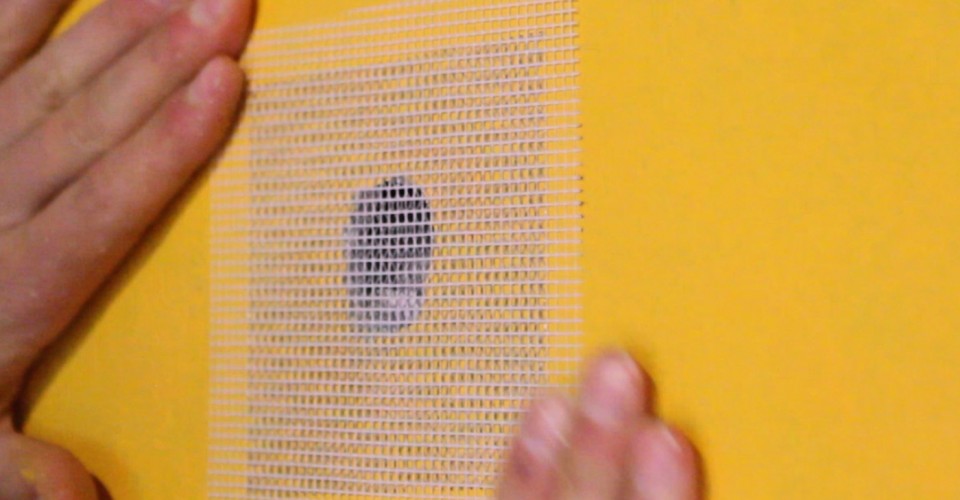
Step 1: apply drywall patch
Make sure the area around the hole is clean and that there are no pieces of dangling drywall. Lay down your drop cloth to catch any mess from above. Remove the backing from the self-adhesive patch and center it over the hole. Smooth it on the wall so it’s taught.
Step 2: cover with joint compound
Using your spackle or putty knife, scoop up a good sized amount of joint compound and apply it directly over the drywall patch. You’ll want to spread an even, yet light coating (like you were spreading frosting on a cake) and be sure to clean up excess spackle around the edges of the patch with the knife. It’s far easier to create a nice and smooth surface when the compound is wet than with a sanding block later. You should apply 1-2 coats and cover the patch completely. Keep in mind that you may be applying joint compound as much as 5 inches beyond the patch itself. If applying more than one coat, sand in between applications. Let the compound dry completely to the touch (about 24 hours).
Step 3: lightly sand so it’s smooth
Using your sanding block, lightly sand over the compound so the surface is smooth. We suggest wearing a mask so that you do not breath in the dust.
Step 4: add texture
Put a small amount of joint compound on a dry sponge and with a light hand, apply the joint compound in a random pattern to mimic the texture of the surrounding wall. You can also use a texture spray however, for small areas like this, the spray may be too heavy handed and difficult. Allow this texture to dry completely.
Step 5: apply paint
With a paintbrush or roller, apply primer paint over the dry compound or use a paint with a built-in primer. Once the primer is dried, apply your final coat of paint – you may need two coats to completely cover the patch.
